FASTQ to Annotation (Part 1)
Posted on Thu 01 October 2020 in Unix
Introduction
In my previous post, I showed how to configure an Ubuntu system to install Bioinformatics programs.
Now, using the environment I created, I will demonstrate a bash script, FastQ_to_Annotation.sh that takes next generation sequencing (NGS) raw reads from human whole genome sequencing as input and produces variant annotation as output. Variant annotation is the process of identifying genetic variants in some genomic DNA sample, and assess, for example, if any of the found variants have any effect on phenotype, such as increased susceptibility to certain diseases.
This demonstration will be separated in four parts. Here in the first part, I will show how to search for NGS projects deposited in National Center for Biotechnology Information (NCBI) databases from which I can download sequencing reads later to use with the script.
Using NCBI’s entrez-direct (EDirect) to retrieve FASTQ files
I open my Unix terminal and activate the bioenv environment:
conda activate bioenv
Now I use the EDirect esearch command to search NCBI’s databases. I must provide a database using the flag -db. Check the available databases here.
I will search the biproject database because it contains metadata from projects dealing with high-throughput genome sequencing, transcriptome expression analysis and so on. I must use the -query flag to provide keywords for search. In this example, I will search for studies dealing with vorinostat, a medicine that is have been used in experimental HIV-1 latency reversal, or “shock-and-kill” treatments.
Remember to use single quotes (”) enclosing the query, especially if it has several words.
# It is just the beginning... (1/4)

# Let's create a folder to organize our files inside
mkdir demo
cd demo

esearch -db bioproject -query 'vorinostat'
The output is just a XML summary including, among other things, the number of results retrieved:
<ENTREZ_DIRECT>
  <Db>bioproject</Db>
  <WebEnv>MCID_5f7726730525f301023dc947</WebEnv>
  <QueryKey>1</QueryKey>
  <Count>61</Count>
  <Step>1</Step>
</ENTREZ_DIRECT>
In this case, the query resulted in 61 results (check the <count> tag). Thus, I will add more commands to retrieve the actual query results. I will pipe, i.e. transfer, the results of the query to the another command — efetch — that will do this work for me. This is the pipe symbol: |.
# ... not there yet ... (2/4)
esearch -db bioproject -query 'vorinostat' | efetch -format native -mode xml
The output is in XML format, and it is unfortunately not very much human-readable. Here is a print screen showing the first result. Notice how the record is contained within a </DocumentSummary> node:

Thus, I will once again pipe the results, this time to xtract command. As its name implies, it extracts information from the XML and formats into a tab-separated format that is easier to understand. I must input the flag -pattern with the part of the XML files that contains the desired information, which are elements. In this example, I will search inside the DocumentSummary for ArchiveID@accession (project unique accession number), ID (an auxiliary ID code to search for samples of said project), Title(the title of the project), Description (normally an abstract of the project) and Reference (a list of project-related papers in PubMed ids — PMIDs, if available). Note that I am separating each argument with spaces, no quotes are necessary in this part of the command.
# ...almost there ... (3/4)
esearch -db bioproject -query 'vorinostat' | efetch -format native -mode xml | xtract -pattern DocumentSummary -element ArchiveID@accession ID Title Description Reference
Here is the tab-separated output of the same record displayed on my terminal:

Lastly, I will add a final command to transfer to a local text file vorinostat_projects.txt that will be saved in the current working directory. Note that if you have a identically-named file in the working directory, it will be overwritten, so be careful.
# Finally there! (4/4)
esearch -db bioproject -query 'vorinostat' | efetch -format native -mode xml | xtract -pattern DocumentSummary -element ArchiveID@accession ID Reference Title Description > vorinostat_projects.txt
The vorinostat_projects.txt file can then be imported into spreadsheets to make easier to organize and read the results.
Refining the search
The command above is a very basic one to search NCBI databases via EDirect. I can create more elaborate queries by adding other keywords and filtering results. NCBI’s search engines have several parameters. I advise you go to any advanced search page on the NCBI website to look for the available parameters.
Using BioProject database as example again, click on Advanced to go the query constructor:

Using the BioProject Advanced Search Builder, I will refine our search. I wish to include only projects that with samples deposited on Sequence Read Archive (SRA), from human samples and that investigated genetic variation. I input all of this into the search boxes:
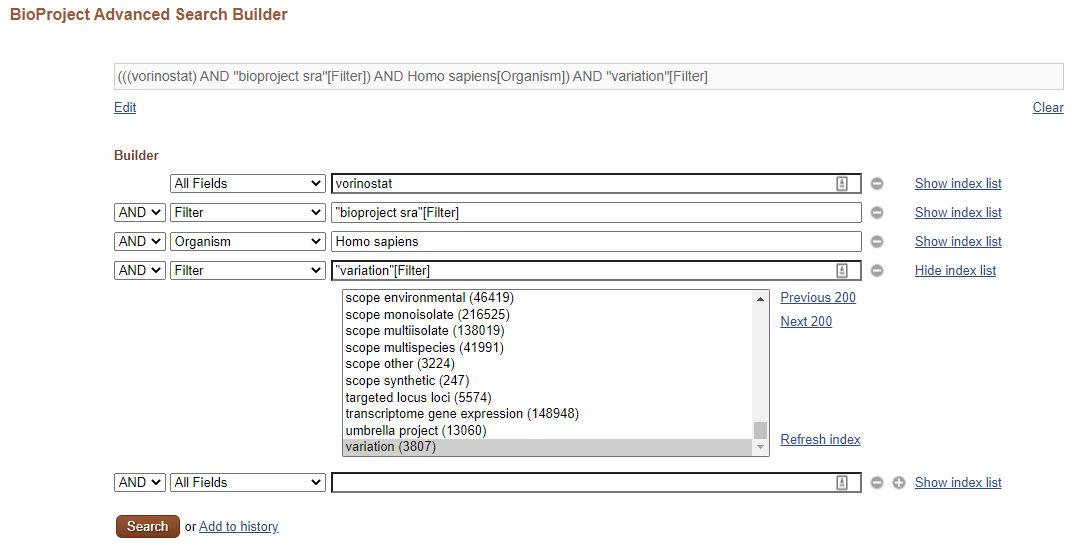
Note that clicking in Show index list will provide a list of curated terms. I used them to filter for “bioproject sra” and “variation” projects. To filter for organism, it is easier: I simply selected the Organism on the drop-down list on the left of the search box. Finally, I connected all keywords with the AND Boolean constructor, resulting on the query:
(((vorinostat) AND "bioproject sra"[Filter]) AND Homo sapiens[Organism]) AND "variation"[Filter]
You could continue the search on the website, of course, but let’s go back to the terminal and continue from there:
esearch -db bioproject -query '(((vorinostat) AND "bioproject sra"[Filter]) AND Homo sapiens[Organism]) AND "variation"[Filter]' | efetch -format native -mode xml | xtract -pattern DocumentSummary -element ArchiveID@accession ID Reference Title Description > vorinostat_refined.txt
Remember: single quotes enclosing the query. Turns out that this refined search was rather restrictive: it resulted in a single record. Checking the vorinostat_refined.txt I see in the abstract that the project dealt with samples from patients with melanoma. One of the last sentences says: “DNA Seq data: biopsy samples from patients pre- and post- treated with Vorinostat; check mutations related to MAPKi-resistance” (MAPKi: Mitogen Activated Protein Kinase inhibitors). Although I had HIV-1-related projects in mind, that’s fine for now, since it is suitable to FastQ_to_Annotation.sh script: identify and annotate genetic variation.
Then, I take note of the project ID: PRJNA436005. I will use it to retrieve reads from this project by searching the SRA with it.
Conclusion of Part 1
In this part I showed how to:
- search NCBI’s databases, (especially BioProject);
- refine searches;
- save search results into local, human-readable text files.
Now I need to use the information gathered here to download read sets in FASTQ format.
Go to FASTQ to Annotation (Part 2)
References
Setting Up Your Unix Computer for Bioinformatics Analysis
National Center for Biotechnology Information